Tighten a fastener to a specified value, or apply a tightening force.
Remove
Remove the component as indicated, either by hand or with a specified tool.
Install
Install the component in the indicated position by pressing, attaching, or placing.
Measure
Measure a length or distance to a specified value.
Apply Grease
Apply grease to lubricate and protect components from friction and/or moisture.
Adjust
Adjust the component to the indicated position by moving, sliding, or rotating.
Apply Friction Paste
Apply friction paste to prevent movement between surfaces.
Press and Release
Press and Hold
Tools and Supplies
Safety and Protection Supplies
Apron
Shop Towels
Nitrile Gloves
Safety Glasses
Bicycle Repair Stand
Common Tools
Hex Wrench or Hex Bit Socket - 2.5 mm
TORX Wrench or TORX Bit Socket - T25
Socket Wrench
Torque Wrench
RockShox Tools
Shock Pump (600 PSI Max)
Lubricants and Fluids
Grease
Friction Paste
Sandpaper
400 Grit
General Safety
SAFETY FIRST!
We care about YOU. Please, always wear your safety glasses and protective gloves when servicing RockShox products.
Protect yourself! Wear your safety gear!
Safety Instructions
You must read and understand the Safety Instructions document included with your product before proceeding with the installation. Improperly installed components are extremely dangerous and could result in severe and/or fatal injuries. If you have any questions about
the installation of these components, consult a qualified bicycle mechanic. This document is also available on www.sram.com.
How to Use This Manual
Legend and Tools
Click on the icon at the top right corner of the screen to display the color legend and the complete list of tools and supplies for this manual in a scrollable dropdown list.
The colors and symbols featured in this manual correspond to specific actions or procedures. A detailed description for each color and symbol is contained in the dropdown.
How to Use Filters
Use the dropdown lists in the SELECT FILTERS: window at the top left of the page to select the preferred language, product model code, and instructional content. Product instructional content filters will vary.
Language Filter: Select Language first. When a new language is selected, all other selected filters will reset.
All non-Language Filters: To reset a non-language filter, click on the X.
Model Code Identification
Product model code and specification details can be identified with the serial number on the product. Model codes can be used to identify the product type, series name, model name, and product version associated with the production model year. Product details can be used to identify spare parts, service kit, and lubricant compatibility.
Model Code example: FS-LYRK-UFA-D1
FS = Product Type - Front Suspension
LYRK = Platform/Series - Lyrik
UFA = Model - Ultimate Flight Attendant
D1 = Version - (D - fourth generation, 1 - first iteration)
To identify the model code, locate the serial number on the product and enter it into the Search by Model Name or Serial Number field at
www.sram.com/service.
Product Appearance May Vary
Your product's appearance may vary from those pictured in this manual.
Images and examples pictured are for conceptual purposes and may vary from product design, appearance, and performance.
Warranty and Trademark
Consult sram.com/service whenever a separate manual is referenced in this document.
Highly specialized tools and supplies are required for the replacement and maintenance of your SRAM components. We recommend that you have a qualified SRAM dealer work on your SRAM components.
Tools and Supplies
Safety and Protection Supplies
Apron
Shop Towels
Nitrile Gloves
Safety Glasses
Bicycle Repair Stand
Common Tools
Hex Wrench or Hex Bit Socket - 2.5 mm
TORX Wrench or TORX Bit Socket - T25
Socket Wrench
Torque Wrench
RockShox Tools
Shock Pump (600 PSI Max)
Lubricants and Fluids
Grease
Friction Paste
Sandpaper
400 Grit
SRAM AXS App
Download the SRAM AXS app, available for free in the app stores, to create your SRAM account, add your components, and customize your SRAM AXS experience.
Through the app, you will also be able to:
Connect your components via Bluetooth to the SRAM AXS app.
Build and personalize multiple bicycle profiles.
Monitor bicycle performance and readiness.
Customize component behavior to match your riding style.
Assign custom actions to your controls.
For component customization within the SRAM AXS app, all AXS components must be paired
into a single system. Procedures for pairing multiple systems, such as an AXS seatpost and
AXS drivetrain, can be found in the System Pairing section.
For optimal system performance and compatibility make sure you have installed the latest
version of the SRAM AXS app and component firmware. Firmware updates are performed
through the app.
System Components
SRAM Battery and Charger
1. SRAM Battery
3. Micro USB Cable
2. SRAM Battery Charger
4. LED Charge Level Indicator
Consult the SRAM Battery and Charger User Manual at www.sram.com/service for additional information.
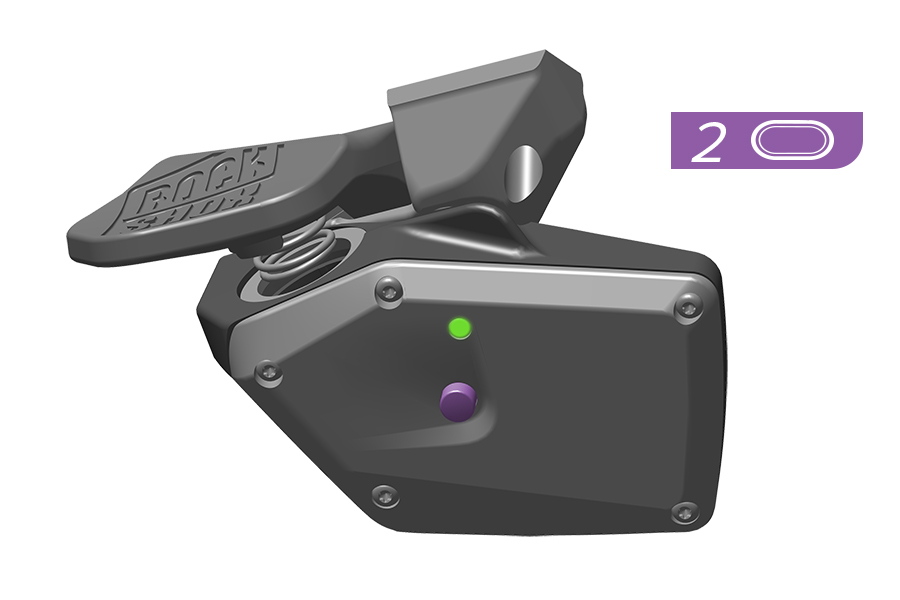
RockShox AXS Handlebar Controller
1. Paddle
5. Mount Plug Screw
2. Battery Cover
6. Clamp Bolt Holes
3. MatchMaker X (MMX) Clamp
(available separately)
7. AXS Button (Pairing)
4. AXS Controller Discrete Clamp
8. LED Indicator
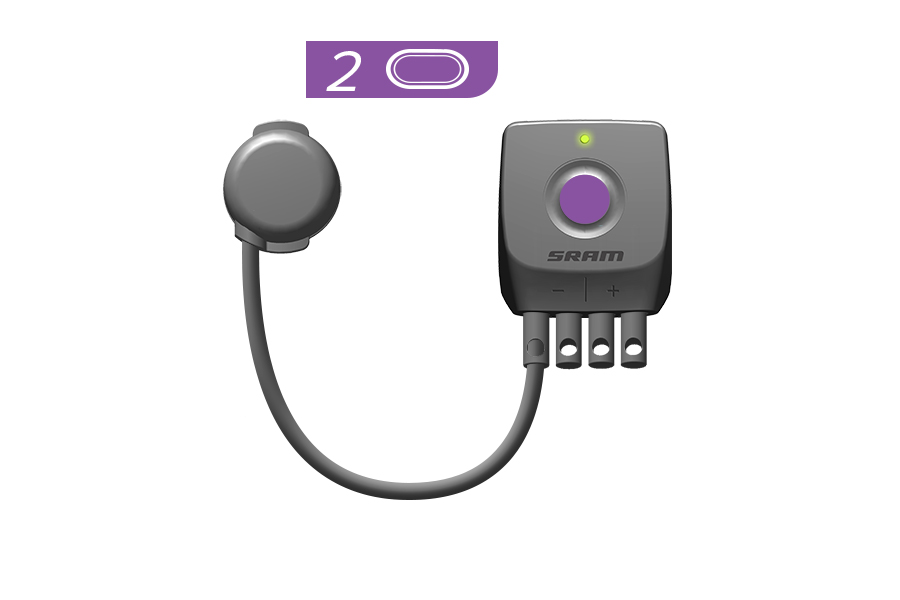
SRAM AXS Pod Controller
1. Left MatchMaker X (MMX) Bridge
5. AXS Button (pairing)
2. Right MatchMaker X (MMX) Bridge
6. LED Indicator
3. Left and Right Infinity Clamp
7. Battery Cover
4. Controller Buttons
Reverb AXS (SP-RVB-AXS-B1)
1. Saddle Rail Clamps
6. Battery Block
2. LED Indicator
7. SRAM Battery
3. Collar/Wiper Assembly
8. Battery Latch
4. AXS Button
(Pairing, Service Mode, Actuation
9. Minimum Insertion Line
5. Battery Slot
10. Bottom Cap
Reverb AXS XPLR (SP-RVB-XPLR-A1)
1. AXS Button (Pairing, Actuation)
7. Saddle Rail Clamps
2. LED Indicator
8. Saddle Tilt Adjuster
3. Battery Slot
9. Collar/Wiper Assembly
4. SRAM Battery
10. Minimum Insertion Line
5. Battery Block
11. Air Cap
6. Battery Latch
Compatibility
Reverb AXS (SP-RVB-AXS-B1) is compatible with 7x7 mm, 7x9 mm, and 7x10 mm diameter metal and composite rails (round and oval).
Reverb AXS XPLR (SP-RVB-XPLR-A1) is compatible with saddles with metal 7 mm diameter rails and composite 7x7 mm and 7x9 mm oval rails, and 7x10 mm oval rails when used with optionally available clamps. Refer to the RockShox Spare Parts Catalog for availability.
Reverb AXS (SP-RVB-AXS-B1) is available in 30.9 mm, 31.6 mm, and 34.9 mm diameters.
Reverb AXS XPLR (SP-RVB-XPLR-A1) is available in 27.2 mm diameter.
RockShox seatpost diameters are printed on the product.
If a seat tube diameter reduction sleeve is used, the sleeve must be a minimum of 80 mm in length, or the minimum specified by your frame manufacturer, whichever is greater.
Notice
The rear tire on some long travel full suspension bicycles may contact the battery (Reverb AXS (SP-RVB-AXS-A1, SP-RVB-AXS-A2) and Reverb AXS XPLR (SP-RVB-XPLR-A1)) when both the seatpost and the rear suspension are fully compressed. Contact with the tire can potentially cause the battery to be ejected from the seatpost.
Before riding, fully compress both the seatpost and the suspension, check tire clearance, and confirm the tire does not contact the battery.
Batteries
Notice
Hands and gloves must be clean before handling the SRAM battery. Contact with sunscreen or hydrocarbon cleaners may cause the battery to crack.
Warning
Consult the coin cell battery manufacturer for safe handling instructions.
Keep the batteries out of reach of children.
Do not put the battery in your mouth. If ingested, seek medical attention
immediately.
Do not use sharp objects to remove the batteries.
Check battery levels before and after each use, and charge or replace batteries as needed.
If either battery is depleted during use, the seatpost will remain in the position it is in until the battery is replaced.
If the AXS controller battery is depleted during use before the seatpost battery, the seatpost AXS button can be used to raise or lower the seatpost.
Notice
If the seatpost is compressed and will not return to full extension, do not manually pull the seatpost head up to extend.
Battery Charge LED Indicator
The LED illuminates when the AXS controller paddle, controller AXS button, or seatpost AXS button is pressed. The color of the LED indicates the battery charge level.
During use, if the seatpost does not respond to the AXS controller, the SRAM battery has reached near depletion (blinking red LED) and the battery safety shut off has been activated.
1. Remove the battery cover from the SRAM battery.
2. Insert the SRAM battery into the SRAM batter charger and charge the battery.
3. When the SRAM battery is fully charged, press the release button on the SRAM battery charger.
4. Remove the SRAM battery.
Consult the SRAM Battery and Charger User Manual at www.sram.com/service for charging instructions, battery maintenance, and travel guidelines.
Notice
Do not discard the battery cover (A) and seatpost battery block (B).
To prevent battery depletion during transportation, remove the battery and install the seatpost battery block onto the seatpost battery slot. Install the battery cover onto the battery.
Failure to cover the battery and seatpost terminals could result in damage to the terminals.
Reverb AXS (SP-REVERB-AXS-B1)
1. Open the battery latch.
2. Remove the battery block.
Reverb AXS (SP-REVERB-AXS-B1)
3. Insert the fully charged battery into the seatpost.
Reverb AXS (SP-REVERB-AXS-B1)
4. Close the battery latch. When installed correctly, the latch will snap into place.
Do not discard the battery cover (A) and seatpost battery block (B).
To prevent battery depletion during transportation, remove the battery and install the seatpost battery block onto the seatpost battery slot. Install the battery cover onto the battery.
Failure to cover the battery and seatpost terminals could result in damage to the terminals.
Reverb AXS XPLR (SP-RVB-XPLR-A1)
1. Open the battery latch.
2. Remove the battery block.
Reverb AXS XPLR (SP-RVB-XPLR-A1)
3. Insert the fully charged battery into the seatpost.
Reverb AXS XPLR (SP-RVB-XPLR-A1)
4. Close the battery latch. When installed correctly, the latch will snap into place.
Pairing
Each AXS system has a primary component that begins and ends the pairing session. The RockShox or SRAM AXS handlebar controller (MTB/flatbar), SRAM AXS BlipBox, or AXS road shift-brake levers must be paired with the seatpost. Pairing allows the assigned AXS controller or shifter to transmit actuation commands to the seatpost.
Reverb AXS and a SRAM AXS drivetrain can be combined to create one AXS system. To combine AXS systems, begin and end pairing with any one AXS primary component (Reverb AXS or SRAM AXS rear derailleur).
Drop Handlebar Bicycle Pairing Options
Reverb AXS can be paired with a SRAM AXS BlipBox (Blips, MultiClic) or SRAM AXS road shift-brake levers to actuate the seatpost.
When all AXS system components are paired into one system, use the SRAM AXS app to assign an AXS BlipBox, or SRAM AXS road shift-brake levers, to actuate the Reverb AXS seatpost.
If Reverb AXS is paired with a SRAM AXS BlipBox, refer to the AXS BlipBox and Remote Shift Buttons User Manual for BlipBox and Blip installation details.
Reverb AXS and Reverb AXS XPLR are NOT compatible with AXS Wireless Blips.
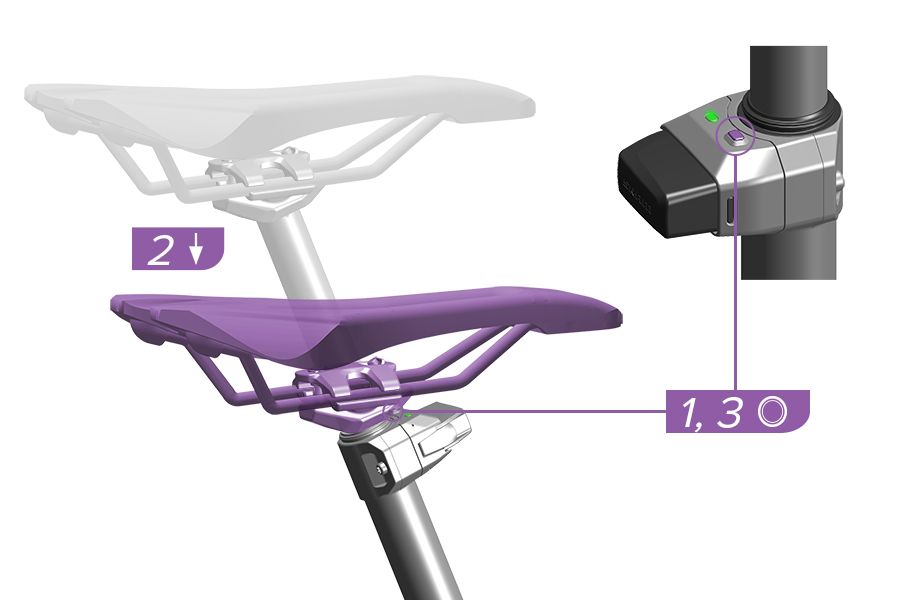
Pair Seatpost and Controller - Reverb AXS (SP-RVB-AXS-B1)
Reverb AXS (SP-RVB-AXS-B1)
To pair a single Reverb AXS system including a RockShox or SRAM AXS controller, or a SRAM AXS BlipBox, begin the pairing session with the seatpost.
1. Press and hold the AXS button on the seatpost until the green LED blinks slowly, then release.
The pairing process will time out after 30 seconds of inactivity.
SRAM AXS Pod Controller
RockShox AXS Controller
SRAM AXS BlipBox
2. Press and hold the AXS button on the RockShox or SRAM AXS controller, or SRAM AXS BlipBox, until the green LED blinks quickly, then release.
Reverb AXS (SP-RVB-AXS-B1)
3. Press and release the AXS button on the seatpost to end the pairing session, or wait 30 seconds for the session to time out. The green LED will stop blinking.
SRAM AXS Pod Controller
RockShox AXS Controller
SRAM AXS BlipBox
Reverb AXS (SP-RVB-AXS-B1)
4. Press the RockShox or SRAM AXS controller paddle or AXS Blip to confirm the seatpost is paired.
The seatpost green LED should illuminate and you should hear the motor.
If the seatpost does not respond, repeat the pairing process.
The pairing process does not need to be repeated when either battery is removed and/or replaced. The pairing process must be repeated if any components are replaced, added, or removed.
Pair Seatpost and Controller - Reverb AXS XPLR (SP-RVB-XPLR-A1)
Reverb AXS XPLR (SP-RVB-XPLR-A1)
To pair a single Reverb AXS system including a RockShox or SRAM AXS controller, or a SRAM AXS BlipBox, begin the pairing session with the seatpost.
1. Press and hold the AXS button on the seatpost until the green LED blinks slowly, then release.
The pairing process will time out after 30 seconds of inactivity.
SRAM AXS Pod Controller
RockShox AXS Controller
SRAM AXS BlipBox
2. Press and hold the AXS button on the RockShox or SRAM AXS controller, or SRAM AXS BlipBox, until the green LED blinks quickly, then release.
Reverb AXS XPLR (SP-RVB-XPLR-A1)
3. Press and release the AXS button on the seatpost to end the pairing session, or wait 30 seconds for the session to time out. The green LED will stop blinking.
RockShox AXS Controller
SRAM AXS Pod Controller
SRAM AXS BlipBox
Reverb AXS XPLR (SP-RVB-XPLR-A1)
4. Press the RockShox or SRAM AXS controller paddle or AXS Blip to confirm the seatpost is paired.
The seatpost green LED should illuminate and you should hear the motor.
If the seatpost does not respond, repeat the pairing process.
The pairing process does not need to be repeated when either battery is removed and/or replaced. The pairing process must be repeated if any components are replaced, added, or removed.
ActiveRide - Set Air Pressure - Reverb AXS
Notice
Reverb AXS (SP-RVB-AXS-B1) and Reverb AXS XPLR (SP-RVB-XPLR-A1) ONLY! Do NOT adjust Reverb AXS (SP-RVB-AXS-A1, SP-RVB-AXS-A2) air pressure. Reverb AXS (SP-RVB-AXS-A1, SP-RVB-AXS-A2) will NOT function if air pressure is altered from 250 PSI / 17.24 Bar.
Reverb AXS (SP-RVB-AXS-B1) ONLY:
Air pressure affects three functional characteristics: 1. Drop force required to fully compress the seatpost when the AXS controller is actuated, 2. the amount the seatpost will compress when the seatpost is positioned below full topout and ActiveRide is activated, and 3. the rigidity of the seatpost at topout.
Less air pressure will decrease the amount of drop force required to fully compress the seatpost when the AXS controller is actuated, will increase the amount the seatpost will compress when the seatpost is positioned below full topout and ActiveRide is activated, and will reduce the rigidity of the seatpost at topout.
Reverb AXS B1 30.9 mm and 31.6 mm ships at 600 PSI / 41.37 Bar, and Reverb AXS B1 34.9 mm ships at 335 PSI / 23.1 Bar. Most riders find these air pressures provide the best balance of drop force, top-out rigidity, and ActiveRide compliance.
With a high pressure (600 PSI / 41.37 Bar) shock pump, pressurize or depressurize the seatpost to the preferred air pressure.
Seatpost Diameter
Air Pressure - Minimum
Air Pressure - Maximum
30.9 mm
400 PSI / 27.58 Bar
600 PSI / 41.37 Bar
31.6 mm
400 PSI / 27.58 Bar
600 PSI / 41.37 Bar
34.9 mm
225 PSI / 15.51 Bar
335 PSI / 23.1 Bar
Notice
To avoid possible permanent damage to a shock pump with a maximum pressure less than 600 PSI / 41.37 Bar, do NOT thread the shock pump onto a 30.9 mm or 31.6 mm Reverb AXS B1 seatpost.
Reverb AXS (SP-RVB-AXS-B1)
T25
Reverb AXS: Adjust Air Pressure (optional)
1. Remove the saddle clamp bolts and saddle clamps.
9 mm
2. Remove the air cap.
Shock Pump
3. Attach a high pressure shock pump (600 PSI / 41 Bar maximum) to the threaded valve.
Pressurize or depressurize the seatpost to the preferred pressure.
Remove the shock pump from the threaded valve.
9 mm
4. Install the air cap hand tight.
T25
5. Install the saddle clamps and saddle clamp bolts finger tight.
ActiveRide - Set Air Pressure - Reverb AXS XPLR
Notice
Reverb AXS (SP-RVB-AXS-B1) and Reverb AXS XPLR (SP-RVB-XPLR-A1) ONLY! Do NOT adjust Reverb AXS (SP-RVB-AXS-A1, SP-RVB-AXS-A2) air pressure. Reverb AXS (SP-RVB-AXS-A1, SP-RVB-AXS-A2) will NOT function if air pressure is altered from 250 PSI / 17.24 Bar.
Reverb AXS XPLR (SP-RVB-XPLR-A1) ONLY:
Reverb AXS XPLR is pressurized from the factory to 400 PSI / 27.58 Bar for an optimum riding experience.
Air pressure affects ActiveRide compliance, as well as seatpost compression and extension speed. ActiveRide compliance and extension speed can be adjusted by increasing or decreasing pressure as preferred.
With a shock pump (600 PSI / 41.37 Bar), pressurize or depressurize the seatpost to the preferred air pressure.
Reverb AXS XPLR (SP-RVB-XPLR-A1)
9 mm
Reverb AXS XPLR (SP-RVB-XPLR-A1): Adjust Air Pressure (optional)
1. Remove the air cap.
Shock Pump
2. Air pressure affects two functional characteristics: 1. Drop force required to fully compress the seatpost when the AXS controller is actuated, and 2. the amount the seatpost will compress when the seatpost is positioned below full topout and ActiveRide is activated.
Less air pressure will decrease the amount of drop force required to fully compress the seatpost when the AXS controller is actuated, and will increase the amount the seatpost will compress when the seatpost is positioned below full topout and ActiveRide is activated.
More air pressure will increase the amount of drop force required to fully compress the seatpost when the AXS controller is actuated, and will decrease the amount the seatpost will compress when the seatpost is positioned below full topout and ActiveRide is activated.
With a shock pump, pressurize or depressurize the seatpost to the preferred air pressure.
Minimum air pressure = 200 PSI / 13.79 Bar
Maximum air pressure = 500 PSI / 34.47 Bar
9 mm
3. Install the air cap finger tight.
Seatpost Installation
Prepare the Frame
Use isopropyl alcohol and a clean, lint-free shop towel to clean any debris or grease from the inside of the frame's seat tube.
Remove any burrs from the frame's seat tube edges then smooth with 400 grit sandpaper.
Apply Friction Paste - Reverb AXS (SP-RVB-AXS-B1)
Reverb AXS (SP-RVB-AXS-B1)Friction Paste
1. Apply a moderate amount of friction paste to the inside of the frame seat tube and contact surface of the seatpost. Do NOT apply grease.
Warning
Failure to use friction paste could allow your seatpost to slip during use which could lead to serious injury and/or death.
1. Apply a moderate amount of friction paste to the inside of the frame seat tube and contact surface of the seatpost. Do NOT apply grease.
Warning
Failure to use friction paste could allow your seatpost to slip during use which could lead to serious injury and/or death.
Install Seatpost - Reverb AXS (SP-RVB-AXS-B1)
Reverb AXS (SP-RVB-AXS-B1)≤6.7 N·m (≤59 in-lb)
1. Insert the seatpost into the frame to the minimum measurement, and seatpost travel, specified on the seatpost, or to the minimum specified by your frame manufacturer, whichever is greater.
Reverb AXS (SP-RVB-AXS-B1): SRAM battery forward.
2. Tighten the seatpost clamp bolt.
Warning
The minimum required seatpost length must be inside the bicycle frame seat tube. Less than the minimum required length can cause damage to the seatpost and/or bicycle frame, which can cause the seatpost and/or frame to fail, which can lead to serious injury and/or death.
1. Insert the seatpost into the frame to the minimum measurement, and seatpost travel, specified on the seatpost, or to the minimum specified by your frame manufacturer, whichever is greater.
The minimum required seatpost length must be inside the bicycle frame seat tube. Less than the minimum required length can cause damage to the seatpost and/or bicycle frame, which can cause the seatpost and/or frame to fail, which can lead to serious injury and/or death.
AXS Controller - Installation
SRAM AXS Pod Controller - MMX Bridge
Warning
CRASH HAZARD: Confirm the AXS Pod controller does not interfere with the brake lever throw.
T25
1. Loosen the clamp bolt.
2. Install the SRAM AXS Pod controller with the (A) pointed tip aligned with the open slot in the clamp.
T25
3. Loosely tighten the clamp bolt enough to prevent the SRAM AXS Pod controller from rotating.
4. Install the T-nut into the clamp.
Friction Paste
5. Apply friction paste to the inner clamp surfaces.
6. Loosely install the clamp and brake lever onto the handlebar.
T255.5 N·m (49 in-lb)
7. Secure the clamp around the handlebar and onto the brake lever.
8. Tighten the clamp bolt.
9. Install the slotted washer onto the clamp.
T25
10. Install the bridge and SRAM AXS Pod controller onto the slotted washer. Install and tighten the bolt loosely; do not tighten the bolt to the specified torque.
T25
11. Loosen the bridge bolt.
T252 N·m (18 in-lb)
12. Rotate the SRAM AXS Pod controller in the bridge to the preferred angle.
13. Tighten the bridge pinch bolt.
T25
14. Loosen the bridge mount bolt.
15. Slide the bridge horizontally to the preferred position.
16. Slide the bridge vertically to the preferred position.
T252 N·m (18 in-lb)
17. Hold the bridge in place and tighten the bolt to the specified torque.
SRAM AXS Pod Controller - Discrete/Infinity Clamp
Warning
CRASH HAZARD: Confirm the AXS Pod controller does not interfere with the brake lever throw.
T25
1. Loosen the clamp bolt.
2. Install the SRAM AXS Pod controller with the (A) pointed tip aligned with the open slot in the clamp.
T25
3. Loosely tighten the clamp bolt enough to prevent the SRAM AXS Pod controller from rotating.
4. Loosely install the discrete clamp onto the handlebar.
5. Install the grip according to the manufacturer's instructions.
T25
6. Loosen the clamp bolt.
7. Rotate the SRAM AXS Pod controller in the clamp to the preferred angle.
8. Slide the bridge horizontally on the handlebar to the preferred position.
9. Rotate the bridge on the handlebar to the preferred position.
T252 N·m (18 in-lb)
10. Hold the SRAM AXS Pod controller and bridge in place, then tighten the bridge pinch bolt to the specified torque.
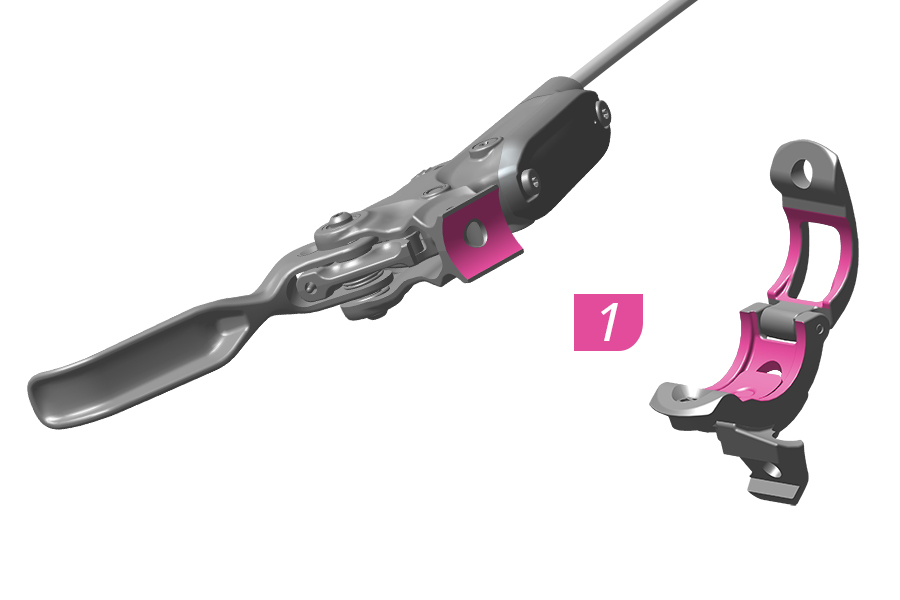
RockShox AXS Controller - MMX Clamp
Friction Paste
1. Apply friction paste to the brake lever and clamp.
T255.5 N·m (49 in-lb)
2-3. Install the brake lever and clamp, and tighten the clamp bolt to the specified torque.
2.5 mm
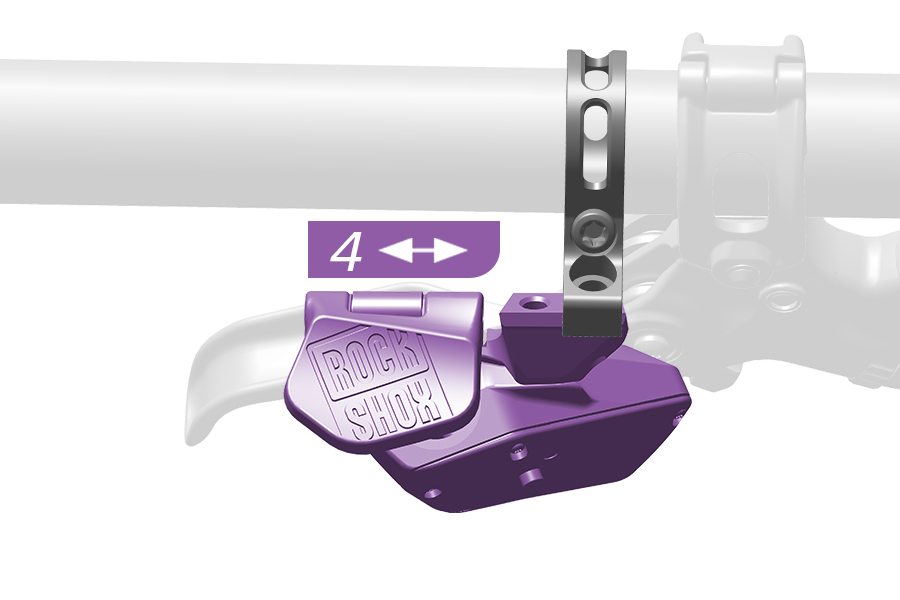
4. Remove the dummy screw.
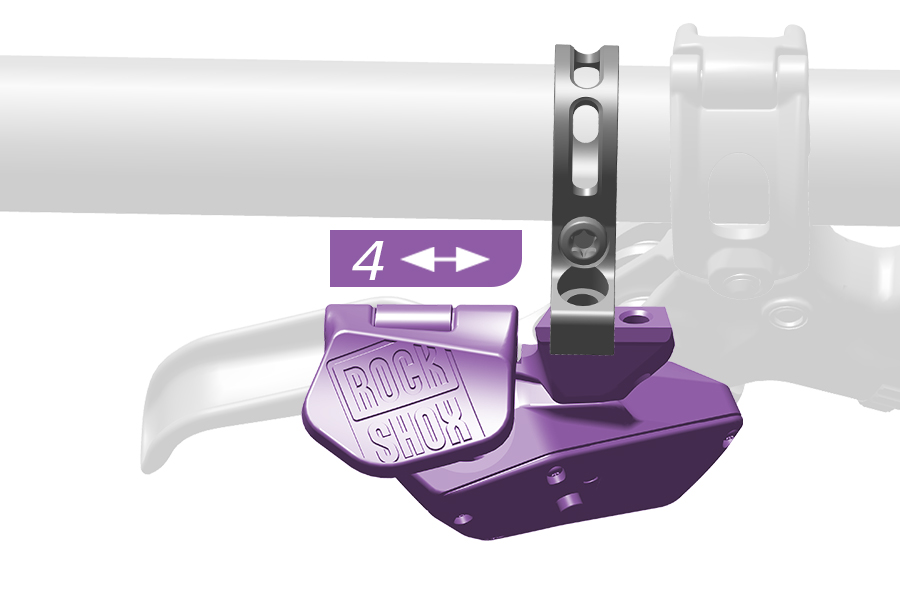
5. Position the RockShox AXS controller inward or outward.
5. Install the dummy screw and tighten it to the specified torque.
6. Install the RockShox AXS controller and bolt.
7. Tighten the RockShox AXS controller bolt the specified torque.
T252 N·m (18 in-lb)
8. Adjust the RockShox AXS controller vertically to the preferred position.
9. Tighten the discrete clamp bolt to the specified torque.
Saddle Installation
Install Saddle - Reverb AXS (SP-RBV-AXS-B1)
T25
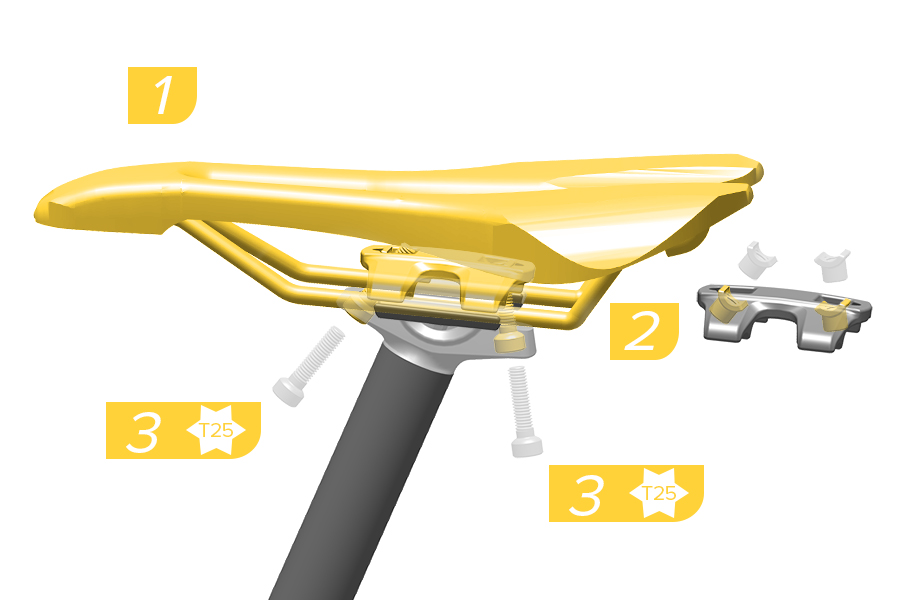
1. Install the saddle with the saddle rails seated squarely on the lower rail clamps.
2. Install the upper saddle clamp and bolt nuts into the upper clamp.
3. Install clamp bolts.
T25
T25
4. To tilt the saddle downward, rotate the front bolt clockwise and the rear bolt counterclockwise.
To tilt the saddle upward, rotate the front bolt counterclockwise and the rear bolt clockwise.
T256 N·m (53 in-lb)
5. Tighten each bolt, in an alternating manner, until each is tightened to the specified torque.
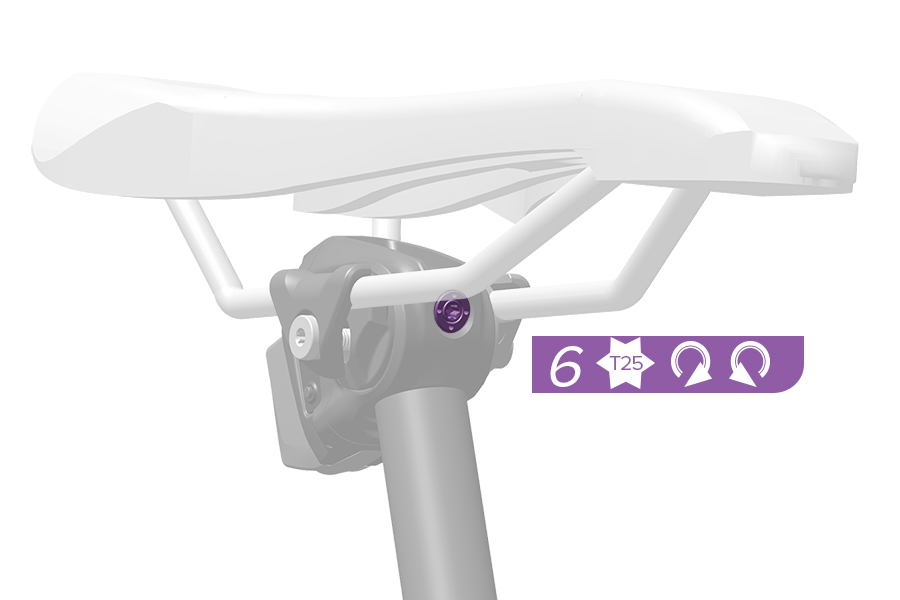
6. Loosen the seatpost clamp bolt.
7. Center the saddle.
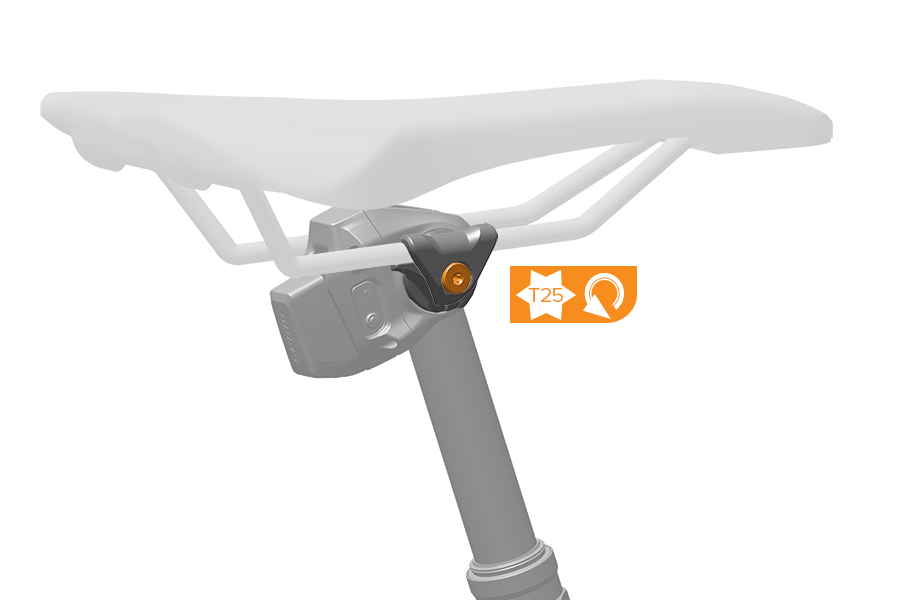
≤6.7 N·m (≤59 in-lb)
8. Tighten the seat collar to the frame manufacturer's specification, or ≤6.7 N•m (59 in-lb), whichever is lower.
Notice
If torque exceeds 6.7 N•m (59 in-lb), the seatpost will not function properly.
Install Saddle - Reverb AXS XPLR (SP-RVB-XPLR-B1)
T25
1. Loosen the saddle clamp bolt.
2. Slide the outer clamps on each side outward.
T25
3. Install the saddle with the saddle rails seated squarely on the inner rail clamps.
4. Slide the outer clamps inward and seat each squarely onto the saddle rails. Hold the clamps firmly against the rails.
5. Tighten the bolt just enough to hold the clamps in place. Do not torque the bolt.
T25
6. Adjust the saddle tilt as needed. If the saddle does not tilt, loosen the clamp bolt until the clamps are loose.
T2512 N·m (106 in-lb)
7. Tighten the saddle clamp bolt to the specified torque.
T25
T25
8. Rotate the tilt adjuster bolt clockwise until it is snug.
To adjust saddle tilt again, loosen the saddle clamp bolt and repeat steps 5 through 7.
9. Loosen the seatpost clamp bolt.
10. Center the saddle.
≤6.7 N·m (≤59 in-lb)
11. Tighten the seat collar to the frame manufacturer's specification, or ≤6.7 N•m (59 in-lb), whichever is lower.
Notice
If torque exceeds 6.7 N•m (59 in-lb), the seatpost will not function properly.
Function
AXS Controller
SRAM AXS Pod Controller
RockShox AXS Controller
Reverb AXS (SP-RVB-AXS-B1)
Reverb AXS XPLR (SP-RVB-XPLR-A1)
To lower the seatpost, push and hold the AXS controller button or paddle and use your body weight to compress the seatpost. To raise the seatpost, unweight the saddle, then push and release the AXS controller paddle.
Seatpost position can be fixed to any point in its travel by releasing the AXS controller button or paddle when the seatpost is at the preferred height.
AXS Road Shift-Brake Levers (1x)
SRAM AXS Road Shifters
Reverb AXS XPLR (SP-RVB-XPLR-A1)
If SRAM AXS road shift-brake levers are assigned to the seatpost in the SRAM AXS app, to lower the seatpost, press and hold both shifter paddles simultaneously, and use your body weight to compress the seatpost. To raise the seatpost, unweight the saddle, then press and release both shifter paddles simultaneously.
Seatpost position can be fixed to any point in its travel by releasing the shifter paddles when the seatpost is at the preferred height.
AXS BlipBox with Blip or MultiClic
Blip and BlipBox
MultiClic and BlipBox
Reverb AXS XPLR (SP-RVB-XPLR-A1)
To lower the seatpost, press and hold the Blip or MultiClic button and use your body weight to compress the seatpost.
To raise the seatpost, unweight the saddle, then press and release the Blip or MultiClic button.
Seatpost position can be fixed to any point in its travel by releasing the Blip or MultiClic button when the seatpost is at the preferred height.
Seatpost AXS Button
If the RockShox AXS controller battery is depleted during use, the seatpost AXS button can be used to raise or lower the seatpost.
Reverb AXS (SP-RVB-AXS-B1)
Reverb AXS XPLR (SP-RVB-XPLR-A1)
1-2. To raise the seatpost, brace the saddle with your hand then press and release the seatpost AXS button once.
3. Press and release the seatpost AXS button once more to lock the seatpost in the desired extended position. Do not sit on the saddle until the AXS button is pressed the second time.
Reverb AXS (SP-RVB-AXS-B1)
Reverb AXS XPLR (SP-RVB-XPLR-A1)
1-2. To lower the seatpost, press and release the seatpost AXS button once then push down on the saddle with your hand.
3. Stop pushing down at the desired compressed position then press the AXS button once more to lock the seatpost in position. Do not unweight the saddle until the AXS button is pressed the second time.
ActiveRide - Reverb AXS (SP-RVB-AXS-B1)
Reverb AXS (SP-RVB-AXS-B1)
Reverb AXS (SP-RVB-AXS-B1)
Reverb AXS (SP-RVB-AXS-B1)
ActiveRide Technology: At (A) full extension Reverb AXS B1 (SP-RVB-AXS-B1) is a firm seatpost.
For more compliance and comfort over rough terrain, ActiveRide is engaged when the seatpost is lowered below full extension.
When lowered (B) below full extension, the seatpost can compress as much as approximately (C) 25 mm while seated for compliance on rough terrain.
Air pressure can be increased or decreased with a shock pump to adjust compression compliance, or movement to the rider's preference.
Decrease air pressure to decrease the amount of drop force required to fully compress the seatpost when the AXS controller is actuated, to increase the amount the seatpost will compress when the seatpost is positioned below full topout and ActiveRide is activated, and to reduce the rigidity of the seatpost at topout. Refer to 'ActiveRide - Set Air Pressure' for procedures.
If the seatpost compresses while seated when fully extended, increase air pressure until the seatpost does not compress while seated.
Seatpost Diameter
Air Pressure - Minimum
Air Pressure - Maximum
30.9 mm
400 PSI / 27.58 Bar
600 PSI / 41.37 Bar
31.6 mm
400 PSI / 27.58 Bar
600 PSI / 41.37 Bar
34.9 mm
225 PSI / 15.51 Bar
335 PSI / 23.1 Bar
Notice
Reverb AXS 30.9 mm and 31.6 mm (SP-RVB-AXS-B1): To avoid permanent damage to the seatpost, do not exceed 600 PSI / 41.37 Bar. Minimum 400 PSI / 27.58 Bar.
Notice
Reverb AXS 34.9 mm (SP-RVB-AXS-B1): To avoid permanent damage to the seatpost, do not exceed 335 PSI / 23.1 Bar. Minimum 225 PSI / 15.51 Bar.
Notice
To avoid possible permanent damage to a shock pump with a maximum pressure less than 600 PSI / 41.37 Bar, do NOT thread the shock pump onto a 30.9 mm or 31.6 mm Reverb AXS B1 seatpost.
ActiveRide - Reverb AXS XPLR (SP-RVB-XPLR-A1)
Reverb AXS XPLR (SP-RVB-XPLR-A1)
Reverb AXS XPLR (SP-RVB-XPLR-A1)
Reverb AXS XPLR (SP-RVB-XPLR-A1)
ActiveRide Technology: At (A) full extension Reverb AXS XPLR A1 (SP-RVB-XPLR-A1) is a rigid seatpost.
For more compliance, comfort and traction over rough terrain, ActiveRide is engaged when the seatpost is lowered below full extension.
When lowered (B) below full extension, the seatpost can compress approximately (C) 25 mm while seated for compliance on rough terrain.
Air pressure can be increased or decreased with a shock pump to adjust compression compliance, or movement to the rider's preference.
Decrease air pressure to increase compression compliance or movement. Refer to 'ActiveRide - Set Air Pressure' for procedures.
If the seatpost compresses while seated when fully extended, increase air pressure until the seatpost does not compress while seated.
Minimum air pressure = 200 PSI / 13.79 Bar
Maximum air pressure = 500 PSI / 34.47 Bar
Notice
Reverb AXS XPLR (SP-RVB-XPLR-A1): To avoid permanent damage to the seatpost, do not exceed 500 PSI / 34.47 Bar. Minimum 200 PSI / 13.79 Bar.
Safety Check
Safety Check - Reverb AXS (SP-RVB-AXS-B1)
Check and confirm the seatpost does not slip in the frame.
Check and confirm the saddle rails do not slip in the seatpost clamp.
Reverb AXS (SP-RVB-AXS-B1)
Reverb AXS (SP-RVB-AXS-B1)
Reverb AXS (SP-RVB-AXS-B1)
Reverb AXS (SP-RVB-AXS-B1)
Full Suspension:
1. Lower the saddle.
2. Fully compress the rear suspension, and confirm the saddle pack does not contact the rear tire.
If any part of the saddle pack contacts the rear tire, adjust as needed, or remove the saddle pack.
Notice
If a saddle pack is installed, to avoid damage to the upper post, do not secure any part of the saddle pack to the upper post.
Safety Check - Reverb AXS XPLR (SP-RVB-XPLR-A1)
Check and confirm the seatpost does not slip in the frame.
Check and confirm the saddle rails do not slip in the seatpost clamp.
Reverb AXS XPLR (SP-RVB-XPLR-A1)
Reverb AXS XPLR (SP-RVB-XPLR-A1)
Reverb AXS XPLR (SP-RVB-XPLR-A1)
Reverb AXS XPLR (SP-RVB-XPLR-A1)
Gravel/Road/Hardtail:
1. If a saddle pack is installed, lower the saddle and confirm the saddle pack does not contact the rear tire.
If any part of the saddle pack contacts the rear tire, adjust as needed, or remove the saddle pack.
Notice
If a saddle pack is installed, to avoid damage to the upper post, do not secure any part of the saddle pack to the upper post.
Maintenance
Maintenance - Reverb AXS (SP-RVB-AXS-B1)
When the post sits for a prolonged period of time without movement, it may develop a slight increase in breakaway friction. This is normal and will cease once the seatpost is cycled.
If breakaway is excessive or does not cease once the seatpost is cycled, cleaning and lubrication of the seatpost may be required.
Refer to the appropriate Reverb Service Manual for service interval schedules and procedures.
Reverb AXS (SP-RVB-AXS-B1) - Service Intervals
Every Ride:
Remove dirt and debris.
Inspect upper post for scratches.
Check battery levels.
1 year, 300 hours, 10,000 actuations, or as needed:
Basic Service
2 years, 600 hours, or 20,000 actuations:
Complete Service
Refer to the Reverb AXS (SP-RVB-AXS-B1) Service Manual for details.
Maintenance - Reverb AXS XPLR (SP-RVB-XPLR-A1)
When the post sits for a prolonged period of time without movement, it may develop a slight increase in breakaway friction. This is normal and will cease once the seatpost is cycled.
If breakaway is excessive or does not cease once the seatpost is cycled, cleaning and lubrication of the seatpost may be required.
Refer to the appropriate Reverb Service Manual for service interval schedules and procedures.
Reverb AXS XPLR (SP-RVB-XPLR-A1) - Service Intervals
Every 50 Hours:
Collar / Wiper Seal / Upper Post grease
Every 200 Hours:
Collar / Wiper Seal and Bushing Replacement
Every 600 Hours:
Complete Service
Refer to the Reverb AXS XPLR (SP-RVB-XPLR-A1) Service Manual for details.
Safety Mode - Reverb AXS (SP-RVB-AXS-B1)
Reverb AXS (SP-RVB-AXS-B1) includes 'Service Mode'.
Service procedures can only be performed after Reverb AXS (SP-RVB-AXS-B1) has set to Service Mode.
Refer to the Reverb AXS (SP-RVB-AXS-B1) Service Manual for more details.
Safety Mode - Reverb AXS XPLR (SP-RVB-XPLR-A1)
Reverb AXS XPLR (SP-RVB-XPLR-A1) does not include 'Service Mode'.
Service procedures can be performed when compressed or fully extended.
Refer to the Reverb AXS XPLR (SP-RVB-XPLR-A1) Service Manual for more details.
Cleaning
It is recommended that you periodically clean your Reverb AXS seatpost. Use a damp cloth to wipe off any dirt and debris. Clean the components with soap and water only. Rinse thoroughly with water and allow the parts to dry.
Notice
Remove the SRAM battery and install the seatpost battery block when the bicycle is being transported or not in use for long periods of time. Failure to remove the battery could result in battery depletion.
Failure to cover the battery and seatpost terminals could result in damage to the terminals.
Storage and Transportation
Storage conditions: Temperature from -40 °C to 70 °C (-40 °F to 158 °F), humidity from 10% to 85%.
Operating conditions: Temperature from -10 °C to 40 °C (14 °F to 104 °F), humidity from 0% to 100%.
Service life: 5 years
Notice
Remove the SRAM battery and install the seatpost battery block when the bicycle is being transported or not in use for long periods of time. Failure to remove the battery could result in battery depletion.
Failure to cover the battery and seatpost terminals could result in damage to the terminals.
Controller Battery Replacement
Battery replacement procedures are the same for all AXS controllers.
Replace the AXS controller battery if the AXS LED illuminates red.
Coin - Counterclockwise
Coin - Counterclockwise
1. Use a coin to rotate the battery cover counterclockwise to the open position.
2. Remove the battery cover and coin cell battery.
3. Remove the coin cell battery from the battery cover.
Notice
To prevent moisture damage do not remove the battery cover o-ring seal.
4. Insert a new CR2032 coin cell battery into the battery cover, positive terminal side first.
5. Reinstall the battery cover into the AXS controller.
Coin - Clockwise
Coin - Clockwise
6. Use a coin to rotate the battery cover clockwise until it stops and locks it into place.
The battery cover and AXS Controller may include open and closed alignment dots. To close the battery cover, confirm the dot on the battery cover is aligned with the closed dot on the AXS Controller.